 |
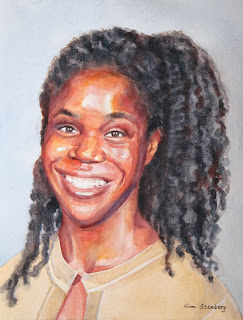
| "Raven" |
The following is what we did in the eighth weeks of the winter term,
2022 in my "Watercolor Portraits" class (my online Zoom classes with the Art League School in
Alexandria, VA).
Lots of things were on
my mind (in addition to being dead tired), so I may have talked too
lengthily. My apologies. All the things I covered, I stand by them. I talked about the importance of accurate measuring
and showed you my work-in-progress (a 40" x 40" oil commission painting
of the National Cathedral from the north side) to prove that, if you know how to measure with the aid of a proportional divider, you can draw anything.
If your drawing of the subject is wobbly, no matter how hard you work on the project, it will never turn out satisfactory. I
once worked on a watercolor portrait commission, which required five
drawings and three paintings to satisfy the client and her three
teen-age/college age daughters. Why? Watercolor is a relatively unforgiving medium and you can't really correct once you start painting. Please trace if you know your drawing is weak. There is absolutely no dishonor or shame in that! Arches paper is not where you practice drawing; you do that in sketchbooks, if possible, daily.
I also talked about the importance of the variegated background wash that goes down first to set the tone. Wrong color choices and poor executions often lead to poor paintings.
I introduced you to my contemporary watercolor hero, Shirley Trevena and her book, "Artist's Studio: Vibrant Watercolours".
(My dead watercolor hero would be John Singer Sargent, LOL.) Her style
is not everybody's cup of tea, but her colors and design sense are
absolutely divine. My palette is a modified version of hers. She doesn't
do portraits per se, but one must get inspirations from all manners of
artists, past and present, if you are really serious about your art.
For
the hair of "Raven", I used almost exclusively Moonglow and Piemontite
genuine (both by Daniel Smith). They both granulate and are effective in
achieving that soft Afro look without much ado. Your black
subject will, of course, have different colors and require different paints. Always paint the overall lightest color first (in my case, the
mixture of French ultramarine blue and burnt sienna), then start carving
out dark shapes.
For the skin tones, I started out by toning the highlight shapes (including the whites of the eyes and teeth) with a very pale cobalt turquoise light (Winsor Newton). Then I pondered about the general color palette of the young woman and decided she has a lot of orange and mahogany (reddish brown). I hardly used any burnt sienna.
I do feel strongly about, when painting black subjects, avoiding the earth colors which tend to mud up everything they touch. The only exception may be mixing, let say, an earth color like burnt
umber with a transparent color such as Winsor violet, but what does that
dark mixture have to do with the human skin tones?
So went in cadmium orange (yes, I have it; I also have cadmium red orange; it beats having to mix them all the time!), cadmium red, and my favorite cool red, Sennelier Helios purple. For darks, I used perylene maroon, perylene violet and ultramarine violet (my favorite is by Schmincke, but it's very expensive!).
The rest is always the same. Make the dental arch and eyes appear rounded by darkening the corners.
Don't stain the teeth yellow even if they appear so in the reference;
you may have to model each tooth carefully (observation is the key as
anywhere else).
The brows are not caterpillars;
they have volume and they should arch at the right places. They are not
of the same tone or hue as they travel, hugging along the brow ridge.
Be careful with the the nasolabial fold shapes. If you want to ruin the expression of a portrait, this is where you concentrate first, LOL!
Darks should be dark enough. The black skin tones are generally dark in the first place, so you will need more layering to achieve the rich luminousity.

No comments:
Post a Comment