 | ||
| "Holmes Run Rocks" |
I decided to blog about my online Zoom classes with the Art League School in Alexandria, VA. This is what we did in the fifth week of the fall term, 2021 for my "Watercolor from Start to Finish" class.
We spent about two hours trying to finish up "Red on Red", but didn't manage. Lol. First, I drew a cherry tomato in graphite to explain the local color, highlight, form shadow, reflected light, and cast shadow. It's easy enough, but once we start painting in color, things can go haywire.
I painted around the highlight shape with cadmium red; for the form
shadow, I switched to permanent alizarin crimson, but switched back to
red for the reflected light. If you use enough paint, you won't need to
glaze. When the tomato was dry, we painted the cast shadow with the
purple mixture of cobalt blue and crimson.
All the cherry tomatoes and red peppers were painted the same way. As a matter of fact, the vase and apple were painted the same way too, although they may have required a glaze or two; the apple has the belly button and stem area that require some fiddling.
As you put down a wet stroke of one color next to the still wet stroke of another color, make sure you remove the excess water from the brush to avoid runbacks. Don't try to be thrifty by using only one or two sheets of paper towel for the entire painting session. The difficulty
of watercolor has everything to do with the control of the ratio
between water and paint and the sensitivity to the moisture level in the
brush and on the paper. (The other difficulty is the
one-way-ticket painting process unique to watercolor, meaning we proceed
only in one direction: from light to dark. That's why we have to
organize and plan ahead.)
Then we painted the green stems and leaves with the green mixture of Winsor lemon and cobalt blue.
Let the first layer dry and do the second layer with a darker green on
the shadows along the stem and on the leaves to create form. When the
second layer is dry, paint the cast shadows with the purple mixture of
crimson and cobalt blue.
For
the zinnias, we first drew the overlapping layers of tiny petals with
appropriate colors of watercolor pencils and started the first layer of
wash in orange (the mixture of red and cadmium yellow pale),
permanent rose, red purple (the mixture of rose and a little cobalt
blue), etc. When it was dry, we had to redraw the petals because
watercolor pencil lines disappeared, giving us one more opportunity to
redraw. For the dark crevices, I used the red purple mixture (crimson
and cobalt blue).
If you wish, you can have
fun with the tiny yellow star-like shapes in the center of some zinnias
by painting them with the mixture of yellow and white gouache
with a rigger brush. Finish the zinnias by painting dark purple cast
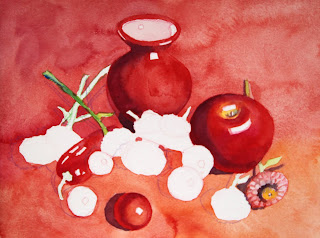
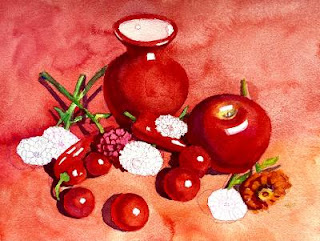
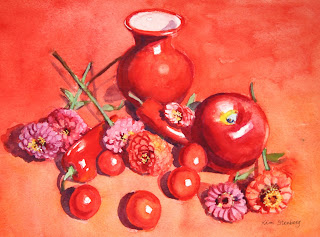
shadows. Below are the two demo process images and finished painting.
 |
| "Red on Red in Progress I" |
 |
| "Red on Red in Progress II" |
 |
| "Red on Red" (watercolor, 9" x 12") |
This week's main lesson was painting rocks. I first drew the design with watercolor pencils
(green, brown, blue, and violet). The shading in the rocks is
demonstration only; don't do it yourself. Landscapes can be overwhelming
to many students. Think the big shapes first. In this exercise there are five big shapes:
the sky and trees, the middle ground cluster of rocks and pebbles on
the left, the foreground big rock and pebbles, the big water shape, and
the small group of rocks in the middle ground on the right. Group
the shapes and cluster them in a meaningful manner that allows the
viewer's eye to enter the painting and travel and linger.
I started painting from the top
(that's how we generally paint landscapes) on dry paper, with cobalt
blue for the sky holes, yellow green (lemon and a bit of cobalt blue)
for the tree foliage in the sun, dark green (quinacridone gold and
ultramarine blue) for the dark foliage in the shadow, and dark brown
(burnt sienna and ultramarine blue) for the shadowy area in the right
bottom of the big tree shape.
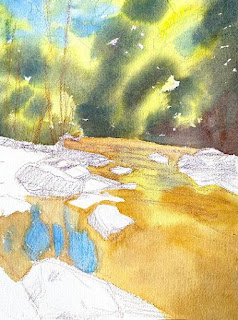
For the water, I used gold, yellow green (lemon and a little bit of cobalt blue), and warmer gold/burnt sienna as it gets closer to the bottom of the paper. Please develop "Holmes Run Rocks" up to this point. We will finish the painting together next week and move on to the triptych exercise!
 |
| "Holmes Run Rocks in Progress" |

No comments:
Post a Comment